I have not had Pop-Tarts in over 10 years… Boy was I missing out!!!
It isn’t just blueberry, strawberry, cherry, and brown sugar anymore.
These adorable tutu baskets are made on a wire basket with 6 inch wide tulle strip of different lengths and colors.
I made these three baskets for Easter, but really, what little girl doesn’t want to skip around carrying their things in one of these?!?
If anyone is interested in a tutorial, please comment and I will upload one with the next basket I make 🙂
Again, one holiday after another has passed since I last posted… but I still have been crafting them away! This year around Christmas, we did a Pinterest night in our community. Each store that participated had an activity to do at their store found off the website Pinterest. I love Pinterest and was excited to plan our activities, especially since the hardware store has DIY all over! I spent weeks trying out different activities… it was NOT as easy as I anticipated. The activities had to be short, simple, and take-home that night. Sadly that basically took ALL painting activities away, but with a whole hardware wonderland left, I was bound and determined to find 2 good crafts.
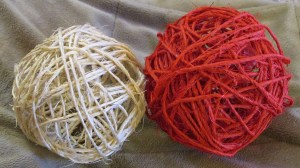
My first trial was a twine ball luminaries.
 The goal was to make these rustic looking balls, cut a nice hole on top and them insert a flameless candle.
-Water balloons
-Glue
-Rubber bands
-Twine
-Bowl (to put glue in)
-Paint (for the red ball)
-Gloves
#1: Cut twine off to use for ball. I think I used 7 yard (?)
#2: Place about 1/2 a container of glue in a bowl you can soak the string in
#3: Blow up the balloons and place rubber bands around them
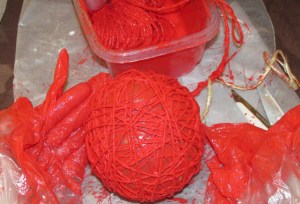
#4: The messy part! Put gloves on and start wrapping.
#5: Let the balls dry overnight… the next day you will have the balls pictured above after you pop and remove the balloon debris.
I prefered the jute-like sisal twine over the cotton-like household twine.
Note: If you want a colored ball, add paint to you glue. I added 2/3 glue to 1/3 paint. This was VERY MESSY! And yes… my cheap gloves broke
 I did not like this craft very much… messy, time consuming, and wouldn’t be done within a few hours
My second trial was a snowman key
Supplies:
-White paint
-Green, red, orange, and black paint markers (or sharpies)
-Old key (or you can ask to buy a blank at a hardware store that makes keys)
-Little piece of wire (to dip the key into the paint)
-Suggest wax paper or newspaper for paint mess
-Suggest straw and bottle
#1: Wrap small piece of wire through key hole
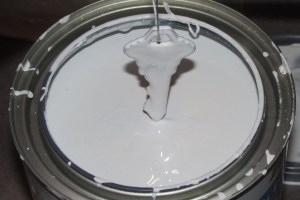
#2: Dip key into white paint. Hold it above the can for a bit and let it drip

#3: l let the key hang from a straw inside a cut soda bottle overnight
#4: I then used the paint markers and drew on a face, buttons, and hat.
Simple! Again, paint had to dry… therefore, it wouldn’t work
My third and forth trial
SUCCESS!!!
Snowflake
Ornaments all made from the nuts and wire at the hardware store 🙂
This was the necklace I made out of copper and flat washers
The people that did brave the FREEZING COLD and snow seemed to have had a lot of fun.
Next time I hope to made personalized washer necklaces with metal stamps.
Stay tuned!
I had a wonderful Thanksgiving this year despite the fact it has been a hectic few weeks. I blink my eyes and Christmas is right around the corner. Ufda!!! I had planned to post pictures of treats the entire week of Thanksgiving, but the night before I was up until 2 am throwing my treats together without a store for open miles… OF COURSE I had the wrong stuff to make half of my intended treat 😦 but I still had fun 🙂
I made Acorns, Turkeys, and Pumpkin Patches
For the Mini Nutter Butter/Hershey Kiss Acorns you will need:
-Mini Nutter Butters
-Hershey Kisses
-Chocolate Chips
-Chocolate frosting
Simple! I don’t even think I need to explain the “How-to-do” of this one…
For the Mike and Ike White Oreo Turkeys you will need:
-White Oreos
-Mini White Oreos
-Box of Mike and Ikes
-Vanilla frosting
-Mini chocolate chips
-Red frosting (or red food coloring and piping bag)
-Kitchen shears
#1: Cut Mike and Ikes in half with kitchen shears
(make sure to put a few orange ones aside for the turkey’s beak)
#2: Secure Mini Oreo and Mike and Ike halves onto larger Oreo with frosting
Simple!
#3: Draw the red gobble thing (waddle or bill) on with frosting, or icing
#4: Secure the orange beak on top of the red icing
#5: Secure the mini chocolate chips on as eyes with frosting of your choice
(I used the chocolate left over from my acorns)
For the LAST treat I made… Candy Corn Pumpkin Patches you will need:
-Chocolate frosting
-Oreos (the half & half kind)
-Candy Corn Pumpkins
I HAD planned on making Pilgrim hats out of the Oreos I had and Rolos… turns out that “mini” Rolos REALLY ARE mini! No store open for 20 miles, so I came up with this backup plan as my treat.
#1: Pull apart the Oreos
#2: Frost them
#3: Add the pumpkins
#4: Crumble white Oreo over them
That’s it! Fun for the young, old, and in-between!
I hope everyone had a HAPPY and SAFE Thanksgiving!!!
Thanksgiving is coming!!! Just like last year, I have a WHOLE bunch of food art lined up!
I will start posting my treats Monday 🙂
Right now I want to hit on an important shopping day between Black Friday and Cyber Monday for small businesses perhaps in your community… Small Business Saturday. Small Business Saturday was started in 2010 to encourage shoppers to shop local and support their small retailers, as well as their communities. I understand that cost, ease of getting everything at once, as well as selection encourages shoppers to go to big retail chains for their needs… HOWEVER you might be pleasantly surprised at what your local small businesses can offer for you! Plus, supporting your local small businesses employs workers from the community, as well as adds money and tax revenue to your city!

Watching $$$ is not fun 😦 I know money doesn’t buy happiness, but it would sure buy the $59.99 Hello Kitty shoes I LOVE and that would surely make me happy! Since I need groceries, a place to live, and those other “necessities” a little more than a pair of Hello Kitty shoes, so I keep eyeing all the cute shoes in absolute envy…
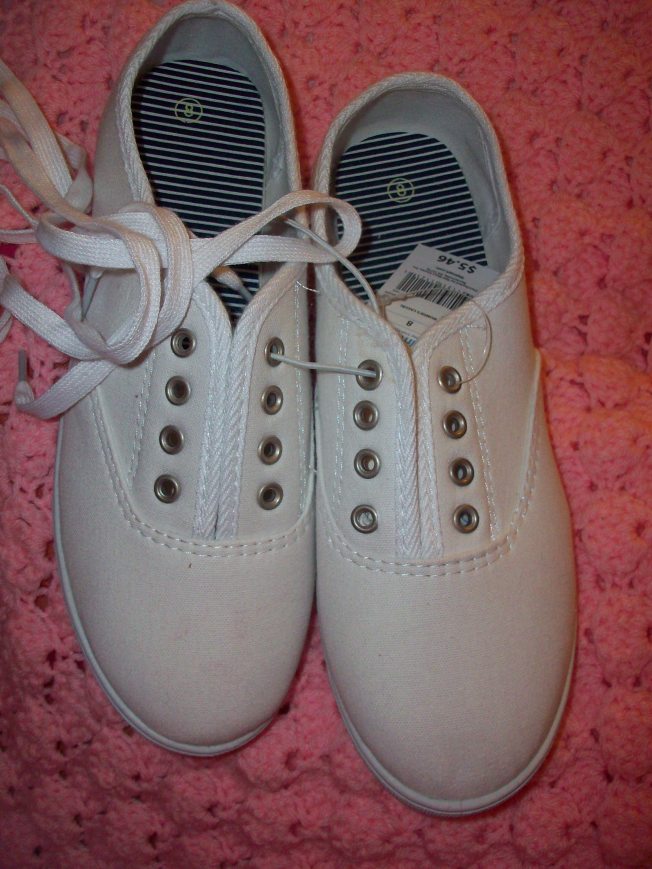
Then this summer canvas shoes came out for around $5.50 at our local Walmart and a light bulb went off in my head…
I WILL MAKE MY OWN!!!
Supplies
-Pair of canvas shoes
-Paint markers (I used an entire pink marker and about 1/2 of a black maker)
-Pencil to trace your pattern
-Coloring image, stencil, or image template (optional)
-Scotch Guard, or Modge Podge (optional)
 Step 1: Take your shoe laces out of your shoes
Step 2: Decide your pattern. I think this is the HARDEST step! My advice is to browse the web for inspiration. I looked up basic Hello Kitty images to come up with my image.
Step 3: Draw your pattern with a pencil on your shoes. I free-handed my image, however using a stencil or template can help. Another EASY way to transfer an image to your shoe is to cut out a coloring book page, draw on the print side (harder) with a pen, flip it over so the print side is on top of your shoe, and draw where your imprinted tracing is (sorry I have no pictures of how to do this). This should leave a light black tracing on your shoe from the coloring book image.
Step 4: COLOR!!! Have FUN!!!
Step 5: PROTECT! Since over 50% of my shoes are still white and canvas, I choose to protect them with scotch guard to prevent them from quickly getting dirty. The paint has not worn off at all, but I still have had a hard time keeping them clean. On the second pair of shoes I made, I made sure my paint was VERY dry and used Modge Podge. I have had a much easier time keeping this pair of shoes clean.
Step 6: ENJOY 🙂
Growing up I was a REAL Girl Scout.

Camping in the woods in a throw together canvas tent, building a fire from kindle and logs, peeing in the woods… that was a GREAT time for me! However, someplace in between my childhood days and my adulthood, my thoughts of camping like a real Girl Scout to the scenes of that in Troop Beverly Hills.

I don’t know if it was the moment I found a BIG, black spider in my sleeping bag, the day I had a tick burned off my butt, my first TRUE horse-fly bite, getting 6 baby leeches removed from between my baby toes, or the fact that I live in Minnesota…
 I dislike camping!!! I love nature until a bug/insect gets involved.
One beautiful fall day I decided to adventure out and gather acorns.
I placed them in a gallon zip-lock bag, got home, and forgot about them for 2 days… BAD! BAD, BAD, BAD!!! I will NOT post any of the pictures “them,” but inside those little acorns… LIVE maggot-like worms (they are officially called: Enteropneusta)! I dumped a mix of isopropyl alcohol and warm water in the bag ASAP and sealed the bag back up. I immediately looked up instructions for drying acorns as the alcohol killed each and every little “worm” in the bag (THANK THE LORD!).
Most directions said to dry the acorns on a cookie sheet @200-250 degrees F for about an hour making sure to turn them so they don’t burn. After about 3 hours of drying my acorn, I could NOT get the image of little white moving worms out of my head and decided to call this a craft….
They were probably 99% okay, but the saying “It is better to be safe, then sorry” is 100% true for me!
At my work, we are doing a Pinterest night at the different businesses throughout town. Lucky for me, I work at a hardware store! This is one idea I have… a snowflake ornament made of nuts. Fun, inexpensive, easy to do. Do I glue it, or do I wire wrap it? I have about a month to decide what we are doing… this is idea #1.
I know it is past Halloween, but this post WILL link into Thanksgiving… I promise!
This year I was a Crazy Cat Lady, or myself in about 20 years…
I pinned stuffed cats to my thrift-store cat nightgown and slippers, painted my face white, put Dollar Tree curlers in my hair, and sprayed my hair gray. Unfortunately the grey wasn’t a silver-grey, but it DID wash out of my hair!!! I even brought my crochet down to our party to keep me busy and it totally fit in with my costume.
I think this is the first picture I have posted of myself… I try to make a GREAT first impression 😉 And yes, I am about 20 years from being truly considered a Crazy Cat Lady, if not already! I am much older than I appear… TRUST ME!
For our party I made BOOnanas, little treat bags with spider dum-dum treats, and Witch Hats. I was in such a hurry to get everything done that I didn’t take any pictures of these creations, however, I had extra supplies to show how to make the witch hats.
What you need:
-Oreo cookies (I have also seen others use thin mints, or other chocolate covered cookie)
-Hershey Kisses
-Frosting (I used vanilla, but whatever taste you prefer that is light in color so you can color it)
-Food Coloring (orange, or red/yellow in a 2:3 ratio)
#1: Pull apart Oreo and take the white cream off (and of course I ate it all on one Oreo later)
#2: Unwrap Kisses
#3: Put frosting in bag, add food coloring and knead
(I think I used 6 drops of red and 9 drops of yellow for 1/2 container of frosting and I had more than enough for 30 Oreos!)
#4: Put about a tsp of frosting in the center
#5: Add the Hershey Kiss and you are DONE!!! Simple and fun for all ages 🙂
How does this connect to Thanksgiving?
Pilgrim Hats
Add a Rolo instead of a Hershey’s Kiss in the center and it looks like a little Pilgrim hat. I haven’t decided if I want to make these the night before our family gathering, or get all the supplies ready to assemble so everyone can make their own. More Thanksgiving crafts to come! I have been on Pinterest getting inspired and ready to show off my skills.
After months and MONTHS of not blogging, I am finally back on! I decided to redo my blog’s format. I will still post crafts and DIY, but instead of waiting for some BIG bunch of crafts, I will post the everyday stuff too. I don’t think there is a day that goes by that I don’t craft… well, unless I am seriously ill, tired to the bone, or busy to a degree that I can’t even reach a crochet hook! This summer I could say for the first time that I was too busy to craft.
Viva Las Vegas! I stayed one week in Vegas with my mom and brother and it was wonderful! We stayed at the Flamingo. It was a great location as it was about half way on the strip.
Daytime I explored the strip with my mom…
…and at night my brother and I explored the strip.
And I might not have been inspired by any crafts, but the food was AWESOME! I tried new desserts…
The BEST food experience? Hash House a go go ! The food there was tasteful, unique, fresh, inexpensive (for Vegas), and HUGE! When I go back again, I will make sure I have a fridge in my room and eat there everyday! I loved it!!!
Today I am back to my normal, crafting life and it makes me happy!
Stay tuned…
Join the world where yarn ends to be just a thread and begins the magical amigurumi creation
The Fashion/Make up/Lifestyle Blog
A parents journey into dyslexia
A fine WordPress.com site
crafty blog
....life Is messy!
And her adventures
While I should've been doing my engineering homework...
"Life is worth living as long as there is a laugh in it"
an adventure of pinterest experiments
Upcycling and Craft for All Abilities
Feel free to use any of these! :) I don't take credit for anything.
Parenting, Crafts, Projects, Activities
Because it sounded like a good idea at the time........
WordPress.com is the best place for your personal blog or business site.